1. Introduction
Backup and restore are critical components when
working with SharePoint. This is the information age, and for a company,
its data is one of its valued assets. Hence, performing a daily backup
of the SharePoint 2010 farm is good practice.
There are several environmental conditions in which a restore may be necessary:
Disaster Recovery (DR):
This is the extreme case, but we cannot anticipate when natural
disasters might strike. An organization must be prepared for such
disasters and have its processes and data in a separate geographical
area.
Hardware: Servers run for long durations and have a lot of load. Parts break and become outdated.
Data: Data gets deleted and needs to
be restored. It is common for users to request for data to be restored.
This could be for a variety of reasons, such as data being deleted
inadvertently or data that has been archived off the system. The data
could be in the root site collection or buried in a subsite.
Viruses: Documents are excellent
carriers of viruses. Word documents are especially susceptible to virus
attacks, as it is possible to embed a code that performs actions against
the file system.
Corruption: SharePoint has a lot of
moving parts and with solutions and features, sandboxing, and
customizations it is quite easy for a user (administrator or developer)
to inadvertently corrupt a component of the system. A manual way of
protecting against this is by limiting who can do what. This is done
through governance and audits.
These items are unpredictable and uncontrollable. To
gain the maximum out of SharePoint, it must be configured properly,
which requires effort. It is well worth preserving that effort, and the
content within SharePoint, with a great backup and DR plan.
SharePoint 2010 has taken the above into account and
has a three-tier approach to backup and recovery. Refer to the following
diagram:
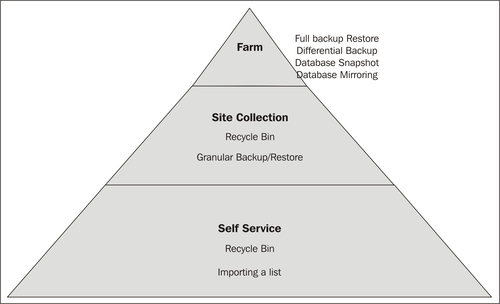
The pyramid shows different levels of empowerment, in
the ecosystem of backup and recovery, in SharePoint 2010. The base of
the pyramid represents the end user and the capabilities that they
possess. The middle tier is the Site Collection Administrators, with a
cross-over with the Farm Administrator. The top of the pyramid
represents what the Farm Administrator can do in conjunction with a
Database Administrator.
The following recipes are only a fundamental start to
a good backup and recovery solution&; within SharePoint. They must
be combined to complement each other. In addition, the best way to have a
foolproof process is to script the backup and recovery process in
PowerShell. This takes human error out of the equation.
That said, it is critical for an administrator to
understand the tools they have at their disposal. These recipes will
assist administrators in understanding the tools built into SharePoint.
2. Recycle Bin settings in Central Administration
As mentioned in the introduction, the first step in
data recovery involves the first stage Recycle Bin. Anything that is
deleted from a site ends up here.
When an item is deleted from the first stage Recycle Bin, it ends up in the second stage Recycle Bin. This is the site collection Recycle Bin.
These are simply libraries that act as containers for the discarded content. Both of these libraries are configurable.
In this recipe, we will modify the current Recycle Bin configuration of an existing web application.
Getting ready
You must have administrator privileges on the SharePoint farm.
How to do it...
Open Central Administration and click Application Management.
Click Manage Web Applications under the Web Applications section.
Find the web application and click to the right of the name — the line will be highlighted.
Click General Settings on the ribbon.
The Web Application General Settings page pops up. Scroll down to the Recycle Bin section, as seen in the following screenshot:
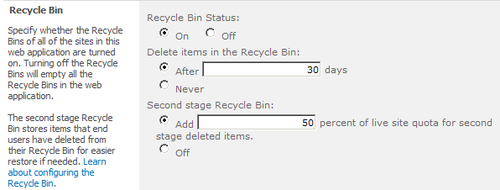
Make sure the After option is selected under the Delete items in the Recycle Bin setting. Change the value of the Delete items... setting from 30 days (default value) to 15 days. Click OK.
How it works...
The Recycle Bin is a library. The first stage Recycle
Bin is tied to the user. The second stage Recycle Bin is scoped at the
site collection level.
This means that a Site Collection Administrator needs
to be involved in order to retrieve a document from the second stage
Recycle Bin. This Recycle Bin has two views:
End user Recycle Bin items: This shows the documents deleted by users that are in their Recycle Bins.
Deleted from end user Recycle Bin: This shows documents that are no longer in a user's Recycle Bin and are only available to the Site Collection Administrator.
There's more...
A Site Collection Administrator can view Recycle Bin items by following these steps:
Navigate to the site collection web page. This is the root website that was created after creation of a web application.
Under the Site Collection Administration section, click Recycle Bin.
Now the administrator can either restore or delete an item, they can also empty the Recycle Bin.
More info
The quota that is set for the second stage Recycle
Bin is based on the site collection, not the web application. If a site
collection has no quota defined and Off is not selected in the second
stage Recycle Bin, the quota is infinite.